 If you’re doing alignment work, a tie rod adjusting tool works much better than a pair of Vise-Grips for rotating tie rod adjuster sleeves. The tie rod adjuster can be turned with a 1/2-inch drive ratchet and rotated 360° to change toe alignment.
For vehicles with hex-style tie rods, such as the 1998 and newer Chrysler Concorde, 300M, New Yorker LHS and Dodge Intrepid, a special left-hand toe adjustment tool that resembles a crow foot wrench comes in very handy.
If an outer tie rod end is worn out and needs to be replaced, a tie rod fork or tie rod separator tool will be needed to detach the tie rod from the steering knuckle or MacPherson strut steering arm. On vehicles with rack & pinion steering, removing the inner tie rods may also require a special socket or crow’s foot wrench to loosen the socket from the rack.
Replacing the end bellows on a steering rack is fairly simple, but the clamp that holds the bellows in place usually needs a crimping tool to lock it in place.
On older cars or trucks with recirculating ball steering, the pitman arm may have to come off if the steering box is being replaced. For this job, you’ll need a pitman arm puller. The puller works like any other gear puller, but is designed to slip under the edge of the pitman arm to pull it off the steering box output shaft.
Idler arm play can cause steering wander, looseness and toe wear on the front tires. Measuring play in the idler arm usually requires a pull scale to exert a measured force on the arm, and a dial indicator to determine how much the arm moves under load. If movement in the idler arm exceeds specifications, it needs to be replaced.
Need to remove the steering wheel to replace a bad turn signal indicator, horn or cruise control switch, etc.? You’ll need a steering wheel puller to separate the wheel from the steering column. But don’t touch anything without first disconnecting the battery or pulling the air bag fuses to prevent an accidental air bag deployment. Wait 15 minutes for the air bag module capacitors to discharge before you attempt to remove the wheel.
For diagnostic work on vehicles with variable-assist power steering or electric power steering, a scan tool is usually required. The scan tool must have up-to-date software that can access the steering electronics to display codes or run self-tests.
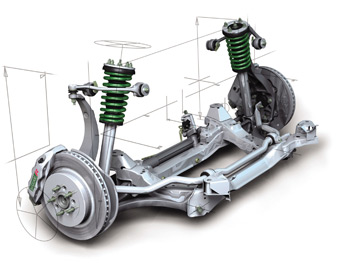
Suspension Work
The upper control arms on trucks with SLA (short long arm) suspensions use shims for adjusting camber and caster. Loosening the bolts that hold the adjustment shims can be difficult because of the tight quarters, so special offset upper arm alignment wrenches can make the work easier.
Another useful tool on 1989 and newer Chevrolet and GMC 1/2-, 3/4- and 1-ton trucks, as well as Astro vans and GMC Safari vans, is an upper control arm knock-out tool. This tool is used for removing inserts on the upper control arm alignment brackets.
Ball joints are a common wear item, and typically need replacing at high mileage. A ball joint fork is a must for separating the lower control arm from the steering knuckle. Once the arm is off, it may be necessary to use a manual ball joint press or a hydraulic press to separate the ball joint from the steering arm if the joint is the pressed-in type. If the old joint is held in place with rivets, you’ll need a center punch and drill to remove the old rivets. For Chrysler screw-in ball joints, you’ll need several different-sized ball joint sockets to replace joints. On 4WD trucks with screw-in ball joints, a single ball joint socket with four drive lugs is usually all that’s needed.
Replacing pressed-in control arm bushings can be done with an upper control arm service set. The set includes a large hex drive C-clamp with adapters to fit most applications.
A spring compressor is another “must have” tool for suspension work. For rear-wheel-drive vehicles that have SLA suspensions, or vehicles that have coil springs, you’ll need a manual or pneumatic spring compressor to compress and hold the spring during removal and installation. For MacPherson struts, you’ll need a manual or pneumatic strut spring compressor if you are rebuilding the strut rather than replacing it with a preassembled strut.
An important feature to look for on either type of spring compressor is some type of soft coating on the teeth that grip and hold the spring. Many springs are factory coated with plastic to protect the spring against corrosion. If the factory coating is scratched or damaged, corrosion can form a hot spot that may cause the spring to break and fail.
If you’re disassembling a strut on an Audi or Volkswagen, guess what? You’ll need a special socket that has two drive lugs to remove the upper strut nut. The same goes for older Ford and GM rebuildable struts with an internal cartridge. These require a long strut cartridge nut that has four lugs to loosen the strut nut.
Shock absorbers can usually be replaced with ordinary wrenches and sockets, but to hold the shock shaft and prevent it from turning, special sockets are available in a range of sizes. There are also tools for breaking off the end of the shock rod if the nut is frozen (this assumes the old shocks are going to be replaced and not reused).
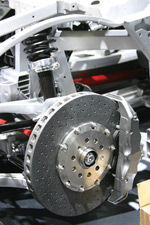
For Wheels & Bearings
For removing wheels, an impact wrench and impact sockets save time and effort. But an impact wrench should not be used to tighten lug nuts unless you have a selection of torque-limiting sticks to control how much torque is applied to the nuts. Torque-limiting sticks are usually color-coded according to their torque rating, and are available to fit most popular lug nut sizes.
If you discover a damaged or broken lug stud when removing the wheel, the old stud can usually be knocked out with a punch. The new stud can be pulled into place by reversing a lug nut and tightening the nut, or by using a lug socket designed for this purpose. If a lug nut is frozen and won’t come off, special impact sockets with teeth that dig into and grip the damaged nuts can be used to back off the damaged nut. Similar sockets are also available for loosening and removing locking lug nuts if the vehicle owner has lost a lug key.
For removing axle nuts on FWD cars and 4WD trucks and SUVs, you’ll need an assortment of large diameter sockets. For most FWD applications, you’ll need a selection of sockets ranging in size from 29 mm to 38 mm. For 4WD pickups and SUVs, you’ll need 43 to 58 mm sockets plus 2-3/8, 2-1/2, 2-1/2 round hex and 2-2/4 round hex sockets. On some trucks, you may also need a special axle nut socket that has four or six lug extensions for removing recessed bearing hub nuts.
The wheel bearings on many older front-wheel-drive cars are press fit in the steering knuckle, so to extract the bearings and/or axle shaft, you’ll need a good hub puller kit. Look for a kit that includes multiple adapters to fit as wide a range of applications as possible.
The hub can now be separated from the knuckle by mounting the special hub puller on the knuckle, positioning the center screw through the center of the hub, and installing a large washer or adapter and nut on the backside of the hub. You can now use an impact wrench to turn down the center screw. The screw pulls the washer up against the back of the hub and pushes the hub out. The hub and rotor can now be removed.
Press-fit bearings can be extracted using the same tool with a different adapter and sleeve on the center screw. Use a sleeve that is larger than the bearing, but smaller than the inside diameter of the bearing housing in the knuckle. When the center screw is tightened, the adapter and sleeve will push the bearings right out.
To install new bearings, the center screw is again placed through the knuckle with an installation washer up against the new bearing. The washer should be sized so that it touches only the outer shoulder of the bearing. A second washer and nut are installed on the end of the screw, and when the screw is tightened it will push the new bearing into the knuckle.
The same procedure can then be used to install the hub and rotor. This is a much faster approach than using a hydraulic press to reassemble the components, and there is less danger of damaging the parts because a hydraulic press can exert considerable force.


