 Technology is constantly changing and hydraulic release clutch systems are no exception. It is not uncommon for once familiar features to disappear from new vehicle models, replaced by “new and improved” designs. This changing landscape can cause confusion, and occasionally result in damage to system components when technicians mistake new features for old ones. Hydraulic slave cylinders without bleed screws are a perfect example.
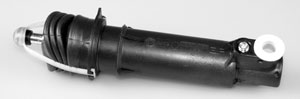
Some designs contain a gold-colored hexagonal (Allen) set screw, which technicians can mistake for a bleed screw. If you should come across a vehicle with this type of slave cylinder, here’s how you should bleed the system.
First, be aware that these slave cylinders are manufactured without a bleed screw to purge air. Do not remove or loosen the gold-colored set screw; it is not intended to be used for bleeding purposes. The system must be bled manually.
Bleeding Procedure
1. Push the slave cylinder pushrod inward and disconnect both bands of the retaining strap to enable the pushrod to fully extend. Do not cut or discard the retaining strap.
2. Tilt the slave cylinder at a 45-degree angle. The master cylinder line port should be facing upward with the port at the high end of the slave. Fill the slave cylinder with fresh, clean brake fluid.
3. Insert the master cylinder line into the slave cylinder port. Lubricate the enclosed O-ring with brake fluid and insert the retaining pin.
4. Hold the slave cylinder vertically with the pushrod facing the ground. If this is not possible due to the master cylinder line, position the slave as far vertically as possible without putting excessive load on the master cylinder line. The slave cylinder must be lower than the master cylinder.
5. Remove the master cylinder reservoir cap.
6. Slowly push the slave cylinder pushrod into the slave approximately one inch, watching for air bubbles in the master cylinder reservoir. Air in the release system should be purged after 10 to 15 strokes of the slave cylinder pushrod.
7. After all air is purged from the system, slowly push the slave cylinder pushrod back into the slave and reconnect the two bands of the retaining strap.
8. Install the slave cylinder with the retaining strap in place. The retaining strap will break free with the first stroke of the pedal.
Note: The plastic cover over the end of the pushrod must be retained; it acts as a lubricant between the pushrod and the fork. Removing the cover can cause a no release condition.
Technical Support
Diagnosing a tough clutch problem? LuK’s technical hotline connects you with a qualified technician and the industry’s most comprehensive clutch diagnostics database. Call 1-800-274-5001 from 8:00 a.m. to 5:00 p.m. ET Monday through Friday, or check out our online support tools at www.lukclutch.com.


