Some 2005-’12 model year 4WD Tacoma and 2WD Tacoma PreRunner vehicles may exhibit a steering rattle noise when driven over rough road surfaces. A newly designed steering intermediate shaft (P/N 45220-04020) has been made available to address this condition.
Repair Procedure: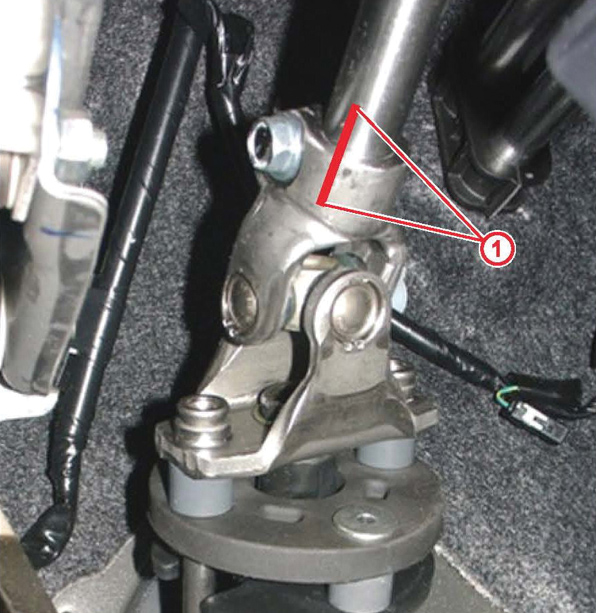
Note: Prior to removing the steering intermediate shaft, make sure the steering wheel and front wheels are straight and remain stationary. Once the intermediate shaft is removed, do not allow the steering wheel to spin freely. Use a steering wheel holder to keep the steering wheel from turning.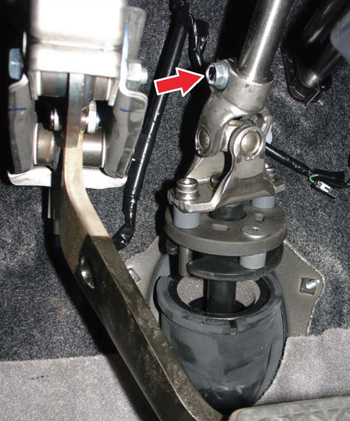
1. Confirm the noise complaint and confirm that the intermediate shaft is the source of the noise.
2. Install a steering wheel holder.
3. Remove the steering column hole cover by disengaging the four clips.
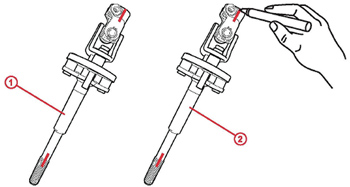
4. Put matchmarks on the intermediate shaft. See Fig. 1.
5. Remove the bolt that attaches the intermediate shaft to the steering column and discard the bolt. See Fig. 2.
 6. Access the intermediate shaft from the driver’s side engine cover and remove the two engine cover clips.
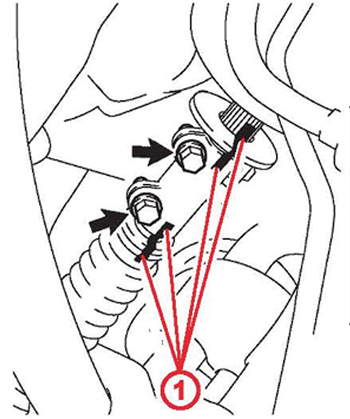
7. Put matchmarks on the intermediate shaft as shown in Fig. 3.
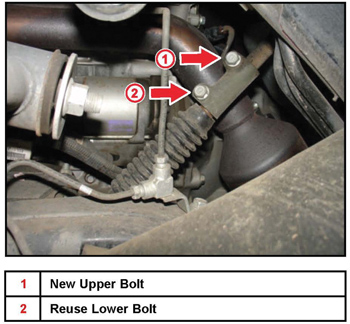 8. Remove the upper bolt that attaches the intermediate shaft No. 1 to the intermediate shaft No. 2 and discard the bolt. (See Fig. 4.) Loosen the lower bolt, then slide the shaft up and out.
9. Place matchmarks on the new intermediate shaft. See Fig. 5.
a. Place the new steering intermediate shaft next to the original intermediate shaft.
b. Transfer the matchmarks on the original intermediate shaft to the same locations on the new steering intermediate shaft.
 10. Install the new steering intermediate shaft.
a. Align the matchmarks and install the intermediate shaft to the steering column first.
b. Align the matchmarks and install the intermediate shaft to the lower intermediate shaft.
Note: Ensure that the splined portion of the shaft is completely seated into the U-joint female end. See Fig. 6. When installing the bolt, make sure the groove in the shaft is aligned properly so that the bolt will prevent the shaft from sliding out of the U-joint.
11. Install the new bolt. Torque: 35 Nm (26 ft.-lbf.)
12. Install the new upper bolt and reuse the lower bolt. 
13. Tighten the two intermdiate shaft bolts. (See Fig. 4.) Torque: 35 Nm (26 ft.-lbf.)
14. Install the engine cover with the two clips and the column hole cover with the four clips.
15. Remove the steering wheel holder.
16. Road-test the vehicle to verify the repair. Confirm that the steering wheel is centered and no warning lights illuminate during the test drive.
17. If the steering wheel is not centered, follow the repair manual steering wheel centering procedure.
18. Perform calibration of the yaw rate sensor and steering angle sensor. Note: Any time alignment is performed, calibration of the yaw rate and steering angle sensor is necessary.
19. Test-drive the vehicle to confirm that the noise is gone.
Courtesy of ALLDATA.


