Tech Tip: GM Drivers Rattled By Engine Noise

Tech Tip: GM Drivers Rattled By Engine Noise

Some GM truck, SUV and minivan owners may complain about a rattle-type noise coming from the engine area at approximately 1,800 to 2,200 rpm. The rattle-type noise may be caused by torsional vibration of the balance shaft. To fix the problem, follow the service procedure below for installing a new tensioner assembly kit.

By Tom Purser, ALLDATA editor, and Jeff Webster, ALLDATA technical writer

Some GM truck, SUV and minivan owners may complain about a rattle-type noise coming from the engine area at approximately 1,800 to 2,200 rpm. The rattle-type noise may be caused by torsional vibration of the balance shaft.

figure 1

To fix the problem, follow the service procedure below for installing a new tensioner assembly kit. If detonation noise is present, perform detonation/spark knock diagnostic testing first.

Applicable Models: 1996-2003 Chevrolet Astro, Blazer, Express, S-10, Silverado and P Models; 1996-2003 GMC Jimmy, Safari, Savana, Sierra, Sonoma; and 1996-2001 Oldsmobile Bravada (with 4.3L V6 Engine)


PARTS INFORMATION

Part Number   Description
12458911     Chain Kit
89017257    Tensioner
10220906    Oil Pan Gasket
88893989     O-Ring and Gasket Kit
3754587      Water Pump Gasket (2)
89017259    Cover

figure 2

Service Procedure
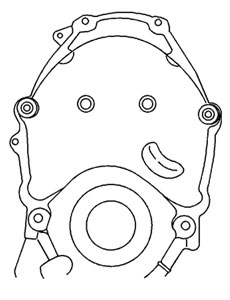
1. Remove the engine front cover.

2. Remove the crankshaft sensor reluctor ring and line up the timing marks on the crank gear and camshaft gear.

3. Remove the camshaft gear and chain. For model years 1996-’98, remove the crankshaft sprocket using the J 5825-A crankshaft sprocket removal tool.

4. Pull the shipping pin and discard. Remove the nylon timing chain tensioner blade from the timing chain tensioner bracket.

figure 3

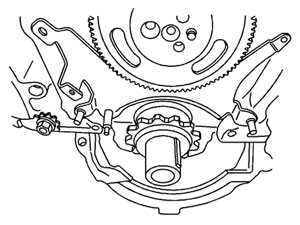
5. Position the bracket on the front of the engine. The upper two attaching holes of the bracket will line up with the center two engine front cover bolt holes. The lower bracket holes will line up with the engine front cover alignment holes (see Figure 1).

6. Use a hammer and the J 46165 pin driver to install the dowel pins through the two lower holes in the bracket and into the engine block. Make sure that the bracket is held firmly in place before proceeding (see Figure 2).

7. For model years 1996-’98, install a roller-type timing chain set. Install the crankshaft sprocket using the J 5590 crankshaft gear installer. Install the timing chain around the crankshaft sprocket and position the timing chain to the driver’s side of the engine.

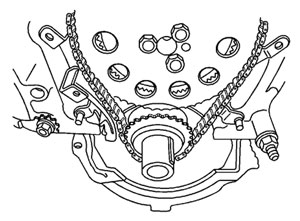
8. Install the nylon timing chain tensioner guide onto the timing chain tensioner bracket pin and
position the top of the guide under the tab at the top of the bracket (see Figure 3).

9. Install the camshaft sprocket into the chain and then to the camshaft. Install the bolts finger-tight. Make sure the timing marks are aligned, then tighten the camshaft sprocket bolt. Tighten the bolt to 18 ft.-lb. (25 Nm).

10. Install the crankshaft reluctor ring.

Figure 4

11. Install the engine front cover and place a washer under the two center cover bolts that extend through the tensioner bracket. These washers are required to maintain the proper crush on the engine front cover seal (see Figure 4). Tighten the bolts to 106 in.-lb. (12 Nm).

You May Also Like

Maximize Your Scan Tool

Are you maximizing your scan tools to their full potential? Don’t let them be just an expensive code reader.

Scan Tool

If there’s a truth that extends across all computerized devices, it’s that we likely utilize only a fraction of the things they have the ability to do. Mobile phones are a great example. How many people do you know who only use them for calls, voicemail and text messages? We all know they do so much more.The scan tools we use every day fall into the same category. Are you maximizing yours to their full potential? Don’t let them be just an expensive code reader. That may be easier said than done, because it takes a lot of time to understand both the scan tool and how well it interacts with the vehicles you’re working on, but there are a few factors that can help you dive a little deeper into the functions at your fingertips.

Brake Lathe Basics

Resurfacing drums and rotors is a machining process with its own specific guidelines.

Refrigerant Oil Has to Be Right

Oil type is just as important as oil capacity.

Three bottles of refrigerant oil
Top 5 Tools: Steve Coffell, Auto World, Hazelwood, MO

Steve Coffell, a technician at Auto World in Hazelwood, MO, says his Top 5 Favorite Tools are: Related Articles – Lisle Low Profile Fuel Line Disconnect – Dent Fix Soft-Shock Mallet DF-SM76 Reduces Damage – New ProMAXX Diesel Fuel Injector Seal Puller/Saver ProKits   OTC Genisys Touch – Quick scan, bidirectional control Snap-on VANTAGE Pro

Wheel Bearing Adjustment Tools & Equipment

A wheel bearing that’s out of adjustment can reduce bearing life and can affect more than just the bearing. It’s important to adjust the wheel bearing endplay to the proper specifications. If the bearing set is adjusted too loose or too tight, it can cause the bearing to fail prematurely. There are a few types of assemblies, so using correct procedures and tools will ensure a comeback-free wheel bearing installation.

Other Posts

New Snap-on Limited Edition Speed Demon Roll Cab

Features include next-level organization, durability, security, mobility and exclusive Speed Demon emblem.

Upgrade Your Air System: It’s Easier Than You Think

Improving your shop airflow is only a benefit, unless you like to spend more time, work harder and make less money.

air flow tubes
2024 Is Your Year to Be the Technician You Always Wanted to Be

As we enter 2024, strategic career planning is essential for success in the automotive repair industry.

happy new year 2024
Impact Wrench Technology

Interchangeable anvils are a feature on some new impacts.