2WD Tacomas have a 5-stud wheel lug pattern. The 2WD Pre-Runner model is the exception with 6-lug pattern and the same brake system as the 4WD models. The non-Pre Runner 2WD models come with single piston floating front calipers and rear drum brakes. Four-wheel drive Tacomas have six-stud wheel lug patterns, which had been used on the prior Toyota pickups (pre-Tacoma trucks).
When ordering parts for a V6 model, make sure you tell your parts supplier if you are working on a Pre-Runner or 4WD model. The calipers may look the same, but there are differences in the pads and rotors. Some electronic catalogs have trouble telling the difference.
Common Problems
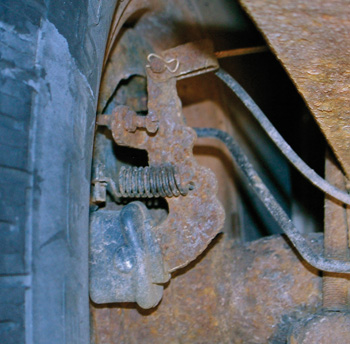
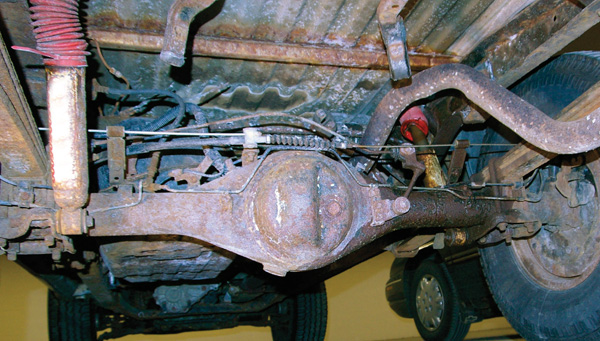 The Tacoma has a very reliable brake system. But, one problem area is the load compensating valve that attaches to the rear axle. The mechanical linkage and the valve causes problems on some trucks by leaking and increasing braking distances. The main culprit is rust and corrosion.
The valve is designed to change brake hydraulic pressure in the rear brakes as the load changes the relationship between the body and axle. The lines and fittings of the valve can corrode. Also, the linkage can corrode and fail to operate properly. Some technicians have reported the spare tire can come in contact with the linkage if the carrier mounting points fail due to corrosion.
When replacing the unit, it is critical to adjust the linkage. Make sure there is 78 mm of distance between the center of the bolt on the axle shackle and the center of the bolt on the arm that connects the linkage to the valve for 2WD trucks and 120mm for 4WD trucks.
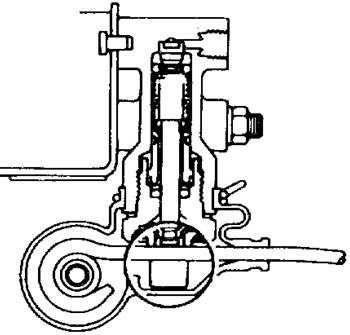
Position the valve body so the valve piston lightly contacts the load-sensing spring. Gently pull down on the the load-sensing spring to confirm the valve piston moves down smoothly.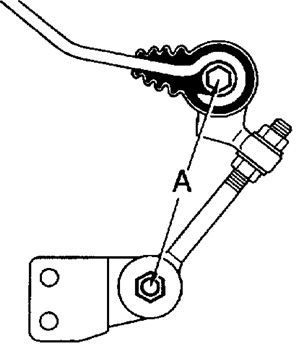 If possible, follow the Toyota procedure for resetting the valve. The procedure involves brake pressure gauges and loading the bed.
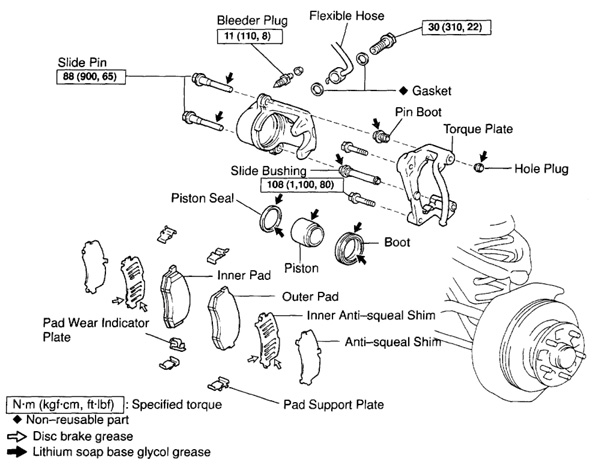
 4WD and Pre-Runner Front Brakes: Disassembly and Inspection
1. Remove the securing hardware and check the pad thickness. The minimum thickness for a single pad is 1.0 mm. If the inboard or outboard pad differ more than 2 mm in material thickness, rebuilding or replacement of the caliper is recommended.
2. Push the pistons back into the caliper.
3. Inspect the rotors for scoring, grooves and cracks. Rotor specifications vary from year-to-year and are different for the Pre-Runner models. Use a dial indicator to measure the disc runout. Position the gauge 10 mm (0.39 inch) from the outside edge. Runout should be below .002" or 0.07 mm. Before machining or replacing the rotor, Toyota recommends changing to position of the rotor on the hub to minimize runout. This can reduce runout, save time and the amount of material needed to be removed by an on-the-car lathe.
4. Anti-rattle springs and clips can be reused if they have enough tension. But, replacement hardware packages with the pins, springs and clips are available at minimal cost.
5. If you are removing the calipers for service, disconnect the flexible hose by removing the union bolt and two copper washer gaskets from the caliper, then disconnect the flexible hose from the caliper.
6. Remove the two mounting bolts and caliper.
Installation
1. If the caliper was removed, install the caliper and torque the bolts to 123 Nm (90 ft./lbs.).
2. Install the brake hose. Replace the two copper washer gaskets and torque the union bolt to 30 Nm (22 ft./lbs.)
3. Install the anti-squeal shims to new pads. Apply disc brake grease to both sides of inner anti-squeal shims. Install the pads into the caliper.
4. Install the anti-rattle spring and pins.
5. Install the wire clip last.
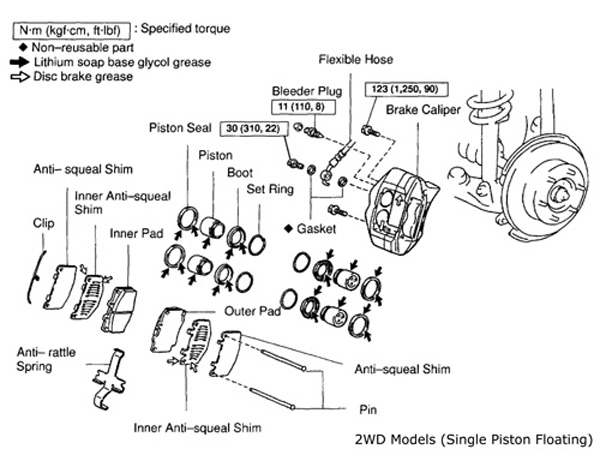
2WD Models (Single Piston Floating)
The 2WD models use a single piston floating piston caliper. If the pads are below 1mm (0.039 inch), replace the pads. When replacing the pads, make sure to lubricate the shims. Also, make sure to clean the caliper bracket and lightly lubricate the abutment clips.
Rotors on these models use a captured design. An on-the-car brake lathe can save you time machining the rotor. If the rotor is replaced, make sure to repack the wheel bearings with grease and use a new seal. Pre-load for the bearing is 34 Nm (25 ft./lbs.). Torque for the rotor bolts are 64 Nm (47 ft./lbs.).
The caliper bracket should be torqued to 108 Nm (80 ft./lbs.). Caliper slide pins should be torqued to 88 Nm (65 ft./lbs.).
Rear Drums
 The rear drums on the two models work the same way, but how they actuate the parking/emergency brake differs.
2WD models use a cable that pulls on a lever inside the drum. Toyota recommends pulling on the parking brake handle several times for the final adjustment.
4WD models use a bell crank on the backing plate to engage the parking brake. It is critical to make sure the tension is correct and there is a gap of 0.4-0.8 mm between the backing plate and adjusting bolt on the bell crank with the parking brake engaged.
Bleeding
Bleeding the brakes can be done using many methods. If the load-compensating valve has been replaced or serviced, it is recommended to start with the valve before bleeding the rear brakes. Begin air bleeding from the wheel cylinder with the longest hydraulic line first.
Parking/Emergency Brake
1. Pull the parking brake lever all the way up, and count the number of clicks. Lever travel with 44.1 lbs. of force should be 12 – 18 clicks. On 2WD models (except Pre Runner), before adjusting the parking brake, make sure that the rear brake shoe clearance has been adjusted.
2. Under the truck on the driver’s side, loosen the lock nut and adjust until the travel is correct. Make sure the rear brakes are not dragging.
3. After adjusting the parking brake on 4WD and Pre-Runner models, confirm that the bell-crank stopper screw comes into contact with the backing plate.