Today in the shop, we have a 2014 Jetta SportWagen and the customer is complaining that it sounds like there’s a helicopter behind the dash.
After some quick poking around, I found that the noise was directly related to the speed of the blower motor. So, odds are while we may not have a bad blower motor, it could be one that’s failing. So, I’ll take us through replacing the blower motor as well as some inspections.
Now, there is more than one way a blower motor can fail. So, after we replace it, we’ll talk about some other things that you might want to look for if you’re having blower motor issues.
As with most Volkswagens and Audis, the blower motor is located on the passenger side, just behind the glove box. This one is pretty easy. Down on the passenger side, there’s a cover; and some have foam and/or fabric that needs to be removed.
First, there are two fasteners that need to twist out. I’ll just take a flat blade screwdriver and remove those. This is basically the same way we would get access to the pollen filter to replace it. With this cover completely out of the way, we’ll be able to see the blower motor.
Next, we’re going to take some bolts out for our glove box to loosen it and get a little more room. Then we’re going to open the glove box — and, of course, this customer has a ton of stuff in his glove box. Remove the three screws at the very top. Next up, remove the lower A-pillar trim. I’m going to pull it up a little bit on the door sill trim because this door sill trim lays on top of the lower kick panel. We don’t need to take this all the way out, just a little bit. Then use your trim tool to remove the lower kick panel.
Now that that’s out of the way, we have enough room to drop our glove box down. If you follow the repair manual, you’ll have to remove way more. But what I’ve found is if you just loosen it, this really does give you more than enough room to get your blower motor out without having to take a bunch of center console stuff apart.

Now, there’s one other part we have to get out of the way before we get our blower motor out. There’s this ducting for the passenger side foot well. It’s held in with one screw. If we come in through the side of our glove box, you can see that one screw (see Photo 1). That’s what we need to remove next. It’s a T20 torx, so, what I usually do is I’ll reach my hand through with a bit driver and remove it. Now that you have that screw out of the way, that ducting piece generally just falls out of the way.
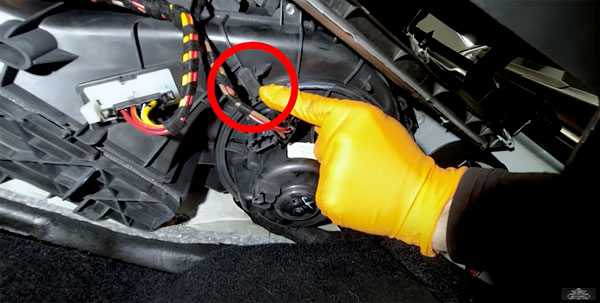
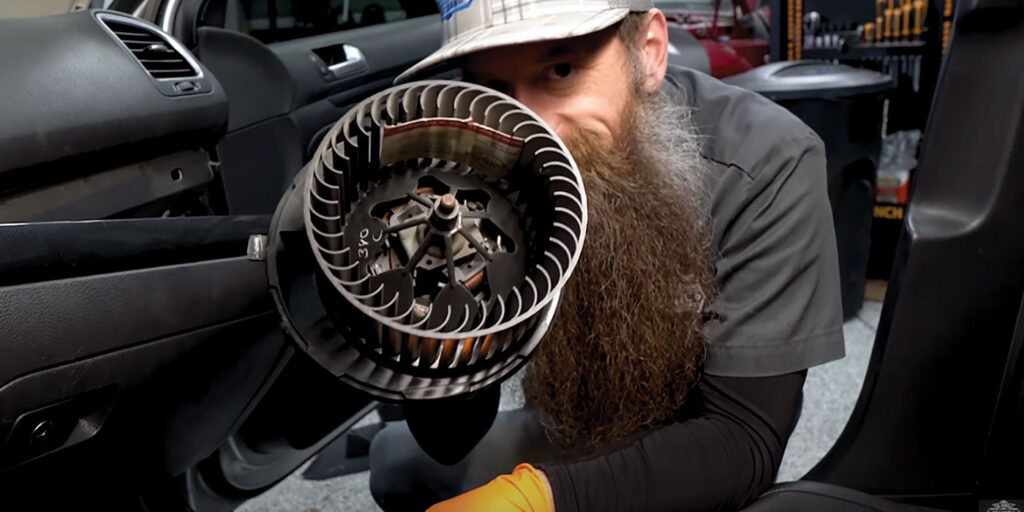
Now that we have easy access to our blower motor, we’re going unplug it. Once you have it unplugged, there’s a tab that you must pull down (see Photo 2). Some vehicles will also have a screw, but this one’s just held in with this tab. So, if we pull that tab down, after a little bit of twisting, about an eighth of a turn, you should be able to wiggle the motor out. And hopefully, no critters or creatures come out with it.
Now that I’m looking at it, I’m actually not sure we have a bad blower motor.
Turns out, there’s a business card lodged in the blower motor — funnily enough for FrostHeater. Ironic. This may be the source of our issue all along. This not only will create some disturbance in airflow but can cause the blower motor to be out of balance. If you take a look, you’ll notice there are little clips that act as balancing weights on the blower motor.
So I’m going put this back in and see if our noise goes away without the business card stuck in there and see whether we actually need to replace the motor because it was out of balance or out of whack or if it’s just this business card, and that all we needed to do was perform a business card removal service.
Well, the good part is we didn’t have a bad blower motor. We just had some yuck, aka the business card, inside of it. So, I’m going to wrap up reinstalling this and put our glove box back together. Also, if you do this and you end up not needing a blower motor, it’s not a bad idea to go ahead and clean it out because these motors get dusty. Once you get it back in and mostly seated, twist it into place, give it a wiggle, make sure it’s locked in. And, of course, plug it in. Then I’ll reach over and give it one more test. Seems to be good.

You’ll notice the series resistor, see Photo 3 on page 130. This is what helps control your fan speed. So, if you have a blower motor that’s only working on fan speed four, high speed, odds are, this guy is what the problem is. Depending on what speed you select, power is sent through either one, two or three resistors in series, and that slows the motor down. Typically, inside one of the resistors will fail, causing the fan only to work on high speed because it bypasses all the resistors. As you can see, this is a pretty big heat sink here, so it does build up a pretty good amount of heat. Now, we’ll put our foot well duct back in.
You’re probably thinking, “Charles, I bought the motor. Isn’t it a good idea to just go ahead and replace it? I mean, I already spent the money.” Yeah, I get that, and I wouldn’t blame you if you’re like, “I’m just going to go ahead and put the motor in anyway.” However, it’s a couple hundred bucks. So, if it’s a couple hundred bucks you can postpone spending, I don’t see that as a bad thing at all.
This one’s in pretty good shape, so I’m not going to replace this motor. But now you know how to do it; it’s a pretty easy, straightforward job.
Now that we have our motor back in and our ducting on, we need to put our glove box back up into place. For that, we just kind of wiggle it back up into place. There is a tab on the right that you may have to spread out a little bit in order to hook it around this side of the dash. There are also two alignment tabs behind this trim piece that have to go into the holes in the main dashboard piece itself. So just kind of wiggle it into place, then it should hold without any screws in it. Then we can go ahead and put our six T20s back in, three on the bottom on the outside, glove box closed, then three up on the top, glove box open. Close your glove box, then we can put our lower A-pillar trim panel back on.
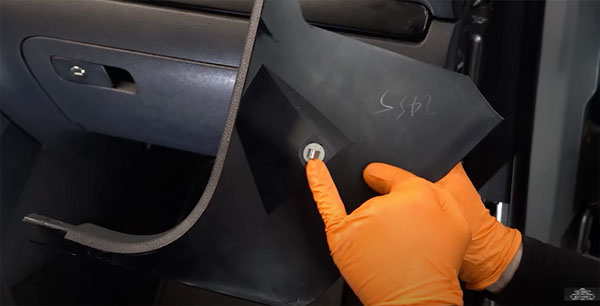
The clip that holds this lower A-pillar trim on can be seen in Photo 4. You need to make sure that’s in place. This is one of the main clips that holds it in. Sometimes this gets left in the body of the car, so you need to make sure you get it out, otherwise your panel won’t sit properly. Make sure that it’s in the seal. Then we snap our sill trim in. Replace the side glove box piece. Ta-da. Now, all we have left is to put the fabric cover back on.
So, I feel like we dodged a $200+ bullet by not having to replace that motor, just digging that business card out of it. But how do we prevent this from happening in the first place? Well, that card was actually in the glove box at some point. And my guess is what happened is, because that glove box is so full, the glove box was opened then closed and that card got pushed up and out of the glove box. And the recirc was probably on, so it fell in and then got sucked up into the motor. Another thing we can do to prevent debris from getting in our HVAC system is keep your cowl cleaned off. Don’t let leaves and pine straw and all that kind of stuff build up on the cowl, because that can get pulled into that heater box as well.
Did we just dodge a $200+ bullet?
Now, blower motor failure on these is actually somewhat common, and it’s kind of a toss up between the blower motor itself going bad, having noise like we heard today or just completely being dead, or series resistor failure. Series resistor failure usually shows itself by the blower motor only working on setting number four. Now, there are some of newer ones that don’t use a series resistor, so the diagnostic process is a bit different, just keep that in mind. TS
To watch this video, go to https://bit.ly/TSHMBlower.