If the first thing that comes to your mind is a bumper sticker, that’s what I intended. Not only did the title for this month’s article on brake tools and equipment “stick” right away, but it made me think I might just have to get some of these printed. Seriously, we all can admit to seeing a random pair of vise-grips, a bungee cord or some other tool in the road and doing some quick thinking and mirror-checking to see if we can safely pull over and snag them. Don’t lie. You know it’s true.
Anyhow, on to brake tools — a subject that never gets old with us.
Diagnostic Scan Tools
Brake system diagnosis and repair on today’s cars is as much a technology-based task as it is a mechanical one. Antilock braking systems (ABS) and their wheel speed sensors have evolved from basic operation into becoming an integral part of traction and stability control systems as well as tire pressure monitoring systems.
Due to the complexity of these systems and the myriad of trouble codes you may encounter, a diagnostic scan tool that is up to date is an absolute necessity. Braking system electronic problems are no longer rare, but part of everyday routine.
An important feature on a scan tool is the visibility of the screen. One of the more common things we find ourselves doing is watching wheel speed sensor data with the vehicle on the move. Generally speaking, it’s at a low speed in the parking lot, but you still have one eye “on the road” and one on the screen, so a nice display is high on our list.
Almost just as common as ABS or traction control diagnosis is the ever-increasing popularity of electronic parking brakes (EPB). We all know pads and rotors are good money-makers and jobs we can usually knock out quickly. The problem with electronic parking brakes? If you don’t have a scan tool that will retract the pistons for pad replacement, you are simply dead in the water. There is no way around it, and that’s not the end of EPB service, there are also electronic problems and trouble codes you will need to diagnose with these systems.
ABS is not limited to wheel speed sensor service, and you will need your scanner for ABS trouble codes, ABS module diagnosis and, in some cases, bleeding the brakes on an ABS system. We are also starting to see the occasional vehicles that require a brake pad thickness reset, so scan tools have become indispensable for brake repairs.
It’s an Electronic World
Vehicle inspection is forever linked to electronic tools that improve our accuracy and transparency to our customers. One of the latest tools to help with this is a laser-enabled brake rotor measurement system. This tool features an easy-to-read screen and has a magnetic head that allows it to affix to a brake rotor. The laser measurement will instantly provide you with rotor wear data that you can share with your customer. Tools such as this not only help us with diagnosis, but prove to our customers that we are dedicated to offering them the most accurate and modern diagnostics and service available.
Brake Line Tools
On the mechanical side of brake repair, one of my favorite topics is brake lines. The frequency of making them is often determined by the part of the country you live in, but here in the Midwest, or the “rust belt” as we like to call it, if you go a week without replacing a brake line, you’re probably on vacation.
The process of making brake lines and the tools that it requires is straightforward, but it can seem confusing at first because like many automotive subjects, a lot of different terminology gets thrown around. Once you know which names and abbreviations go together, you can use the ones you like and forget about the rest.
For what we do on everyday cars and trucks, there are two types of brake line flares: the double flare and the bubble flare. Historically, the most common (at least here in the States) has always been the double flare. The double flare was designated as the automotive standard by The Society of Automotive Engineers (SAE). It is also referred to as an inverted flare, a 45-degree inverted flare, an SAE double flare or any other combination of the names. Regardless, they are all the same thing.
As one of the names suggests, the base of a double flare is formed at a 45-degree angle to the brake tubing. (See Photo 1.) It is called a double flare because the final flare is two layers of tubing pressed together. At a quick glance, a single flare might look the same as a double, but a single flare can never be used for brake line applications because the friction created between the flaring die and brake line has a tendency to create cracks and galling along the edges of the flare.
The bubble flare was historically known as the standard flare on European and Asian vehicles and was designated as the automotive standard by the Deutsches Institut fur Normung (DIN) and International Organization for Standardization (ISO). As a result, bubble flares are also referred to as DIN flares, ISO flares or any combination of these abbreviations along with the term “bubble.” Regardless, they too are all the same thing. Bubble flares take their name from their shape, but it’s important to recognize that the base of a bubble flare is formed at a 90-degree angle to the brake tubing. (See Photo 2.)

Both types of flares are equally effective, but they differ in the fact that double flares seal as they are sandwiched between the line nut and brake component, whereas bubble flares will compress slightly when they are tightened and rely on this pressure to create their seal. Today, either style of flare may be seen on any make or model of vehicle, so when you are making a brake line, it is critical to use the correct flare and correct fitting.
Preparing the Brake Line
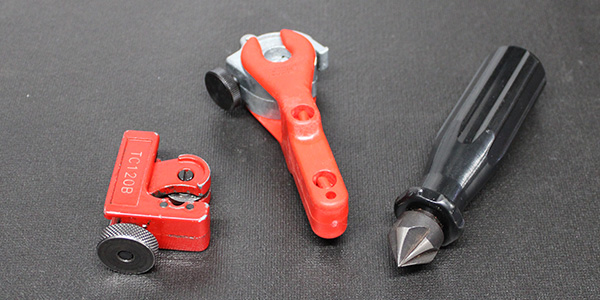
Cutting the brake line is done by a tubing cutter. Many different types of cutters exist, and all are effective, but our favorites are the mini-cutters, simply due to their size and ease of use in tight areas. Also at the top of the list is a ratcheting tubing cutter. These save a lot of time, and the spring-loaded mechanism keeps the cutting wheel at a consistent tension against the tubing for a quick easy cut.
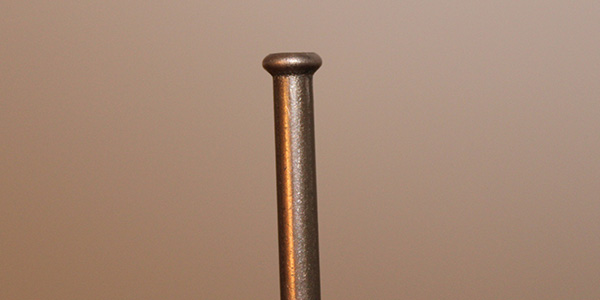
Once the brake tubing is cut, it is important to chamfer the inside of the line. As the tubing is cut, the metal is displaced and reduces the inside diameter of the line, consequently affecting the quality of the flare. (See Photos 3 and 4.)
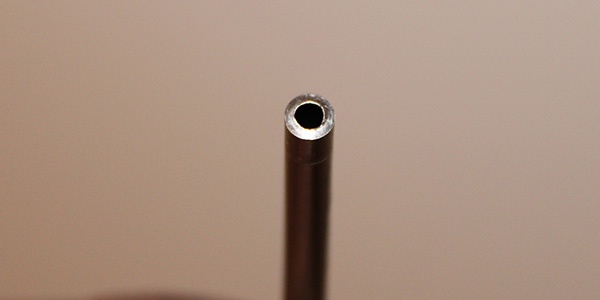
Photo 3 
Photo 4
Making the Flares
There are two types of dies that are used to flare tubing. One is a female split die that securely clamps the line in place and is also responsible for the shape of the base of the flare. It is important to note that 3/16 brake line and 4.75mm brake line are the same size, the fractional inch being the standard American and the metric being the standard overseas.
Brake tubing flare kits will generally have two sets of split dies for 3/16 and 4.75mm tubing. Some kits may have both sizes indicated on both sets of split dies, however, some kits only have one size on each set. When this is the case, the 4.75mm dies are inherently associated with the bubble/ISO/DIN type of flare and, if you look into the die, you will see that it will form a 90-degree angle at the base of the flare.
If the split die is marked exclusively 3/16, it is inherently associated with double/SAE/inverted type of flare, and you will see by looking into it that it will form a 45-degree angle at the base of the flare. You can clearly see the difference by looking into the dies; one set is designed for a double flare, one for a bubble flare.
The second type of die is a male die that is used to form the shape of the flare itself. The male dies are formed to either create the shape of the bubble flare, or they are a cone shape to create a double flare.
To make a correct double flare, you start by first selecting the correct female split die (that will form a 45-degree angle at the base of the flare) and clamp the tubing in the die so that the end of it is flush with the end of the die. The next step is using the male die for a bubble flare and make your first press to form the bubble shape on the end of the line. Next, switch to the cone-shaped male die to finish off your double flare.
To make a correct bubble flare, you first select the correct female split die (that will form a 90-degree angle at the base of the flare) and clamp the tubing in place so the end of it is flush with the end of the die. Then, you simply use the bubble flare male die to form the flare.
Brake Line Fittings: The Final Piece of the Puzzle
Brake line fittings can have either metric or standard thread, but the most important detail to know is that one type is designed for a double flare and one for a bubble flare. Fittings for a double flare are threaded all the way to the end and have a 45-degree chamfer on their inside diameter. (See Photo 5.)

Fittings for a bubble flare have a lead (an unthreaded portion) at the front of the fitting that is designed to extend past the threads in a brake component and put pressure on the bubble flare to create the seal. (See Photo 6.)
A final word of wisdom when making brake lines is to always inspect and match the original fittings and flares when removing the old lines. Never put it past an automaker to throw a weird combination or styles of fittings and flares your way, so doing one line at a time and matching things up is a good way to go.

A time- and money-saving practice that can make a brake line job go much quicker is to snip the old line right at the fitting, then use a socket to remove it. Quickly grind the brake tubing flush with the fitting on a grinding wheel, then use a drill bit to drill the old line out of the fitting.
Using this method keeps you from matching up fittings all day long and ensures that you use the correct one. It also saves your customer money by reusing original line fittings and it lets you use more of what you invested in to make your living — your tools. TS