Tech Tip: Audible Spark Knock, MIL On and DTC P0332 Set on GM Models

Tech Tip: Audible Spark Knock, MIL On and DTC P0332 Set on GM Models

Some customers may comment on a mild to severe engine ping (commonly referred to as spark knock), usually worse during acceleration, and/or an illuminated MIL.

Models affected:
1998-2002 Chevrolet Camaro, Corvette

figure 11998-2002 Pontiac Firebird with 5.7L Engine (VIN G – RPO LS1)

1999-2002 Chevrolet Silverado, Suburban, Tahoe

2002 Chevrolet Avalanche

1999-2002 GMC Sierra, Yukon, Yukon XL

2002 Cadillac Escalade, Escalade EXT with 4.8L, 5.3L or 6.0L Engine (VINs V, T, Z, N, U – RPOS LR4, LM7, L59, L09, L04)

Some customers may comment on a mild to severe engine ping (commonly referred to as spark knock), usually worse during acceleration, and/or an illuminated MIL. Upon investigation, the technician may find DTC P0332 set.

This condition may be the result of corrosion of the rear bank knock sensor due to water intrusion into the sensor cavity.

This condition is more apparent on vehicles in which customers frequently wash the engine compartment.

Replace the rear bank knock sensor (P/N 10456603) and build a dam (wall) around the sensor using RTV to divert water away from the sensor. Use the procedure and part number listed.

1. Remove the intake manifold. Refer to the Intake Manifold Replacement procedure in the Engine Controls sub-section of the appropriate service manual. figure 2

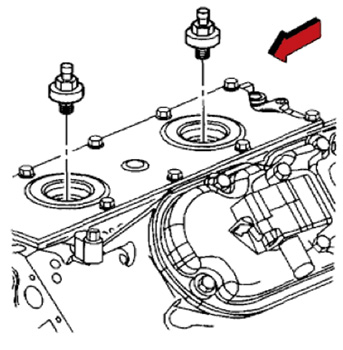
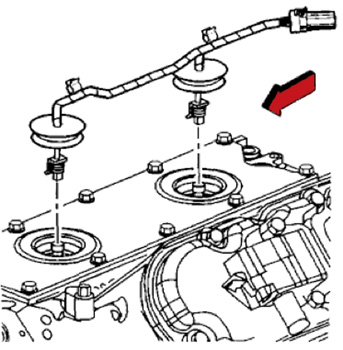
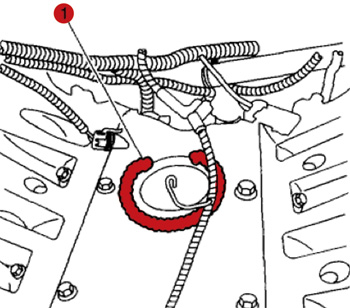
2. Remove the wiring harness assembly from the knock sensor.

See Figure 1.

3. Remove the rear bank knock sensor.

See Figure 2.

4. Install the new rear bank knock sensor. Tighten the knock sensor to 20 Nm (15 lb.-ft.).

5. Install the wiring harness assembly to the knock sensor.

6. Apply a bead of RTV silicone sealant approximately 9 mm (3/8”) wide and 6 mm (1/4”) high along the outside edge of the ridge on the engine block valley cover around the rear bank knock sensor. DO NOT form a complete circle. Leave the rear section open as shown in Figure 3.

7. From the underside of the intake manifold, completely remove the rear intake manifold seal (foam material).

Figure 38. Install the intake manifold. Refer to the Intake Manifold Replacement procedure in the Engine Controls sub-section of the appropriate service manual.


Technical service bulletin courtesy of Mitchell 1.

For more information on Mitchell 1 products and services, automotive professionals can log onto the company’s website at www.mitchell1.com.


You May Also Like

Maximize Your Scan Tool

Are you maximizing your scan tools to their full potential? Don’t let them be just an expensive code reader.

Scan Tool

If there’s a truth that extends across all computerized devices, it’s that we likely utilize only a fraction of the things they have the ability to do. Mobile phones are a great example. How many people do you know who only use them for calls, voicemail and text messages? We all know they do so much more.The scan tools we use every day fall into the same category. Are you maximizing yours to their full potential? Don’t let them be just an expensive code reader. That may be easier said than done, because it takes a lot of time to understand both the scan tool and how well it interacts with the vehicles you’re working on, but there are a few factors that can help you dive a little deeper into the functions at your fingertips.

Brake Lathe Basics

Resurfacing drums and rotors is a machining process with its own specific guidelines.

Refrigerant Oil Has to Be Right

Oil type is just as important as oil capacity.

Three bottles of refrigerant oil
Top 5 Tools: Steve Coffell, Auto World, Hazelwood, MO

Steve Coffell, a technician at Auto World in Hazelwood, MO, says his Top 5 Favorite Tools are: Related Articles – Lisle Low Profile Fuel Line Disconnect – Dent Fix Soft-Shock Mallet DF-SM76 Reduces Damage – New ProMAXX Diesel Fuel Injector Seal Puller/Saver ProKits   OTC Genisys Touch – Quick scan, bidirectional control Snap-on VANTAGE Pro

Wheel Bearing Adjustment Tools & Equipment

A wheel bearing that’s out of adjustment can reduce bearing life and can affect more than just the bearing. It’s important to adjust the wheel bearing endplay to the proper specifications. If the bearing set is adjusted too loose or too tight, it can cause the bearing to fail prematurely. There are a few types of assemblies, so using correct procedures and tools will ensure a comeback-free wheel bearing installation.

Other Posts

TEXA Releases IDC5 CAR 76.5.0 Update

IDC5 CAR 76.5.0 is characterized by over 2600 new possible selections for the major makes on the market worldwide.

2024 Is Your Year to Be the Technician You Always Wanted to Be

As we enter 2024, strategic career planning is essential for success in the automotive repair industry.

happy new year 2024
Software Focus: Efficient Diagnostics

Discover how to quickly retrieve codes, access exclusive repair information, and develop a strategic plan for optimal diagnostic results. This video is sponsored by Bosch.

Why ECU Reflashing Needs Certain Power Levels

A reflash power supply is not designed to jumpstart the vehicle.