pry the ball joint out of the bearing carrier, but if you use a liberal amount of penetrating oil it should slide out easily.
6. Install the replacement ball joint into the lower arm, install new bolts and torque to 20-25 ft.-lbs.
7. Slide the ball joint into the bearing housing and install the pinch bolt, then tighten to spec.
8. That’s it. The nut plate aligns the ball joint in the arm, so unless something is bent or damaged, re-alignment should not be an issue.
As the VW Passat transitioned to the Audi A4 chassis, it inherited the more modern suspension used on that car. From a simple front strut and rear beam axle, the change brought complexity and new service challenges. From a simple design much like the smaller cars, the A4 chassis stepped up to a much more complex multi-link front strut suspension while retaining the rear beam axle on front-wheel-drive cars, or a multi-link rear suspension for AWD cars.
The main problem with this suspension, front and rear, has been the complexity. With two upper and two lower ball joints, plus more than double the number of bushings, there are a large number of potential points where wear and damage can occur. Running changes, and a corporate upgrade in the 2002 model year means having to do a little research to make sure that replacement parts are correct, and that replacements and upgrades include all of the parts necessary to match the parts on the car.
Most of the upgraded replacement parts are visually different and can be easily recognized once they are compared to the originals. Note: Be aware that some upgraded or superseded parts are not required to be installed on both sides of the car per factory instructions, so you could get a car in that has different parts side to side.
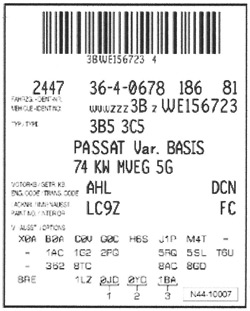
There also will be differences in materials used (steel/aluminum), depending on model and powertrain. Almost all VW and Audi parts will be determined by the information available on the Vehicle Data Sticker (see Photo 2) that will be located in the trunk near the spare tire well or in the owner’s manual if it’s available. Trying to get the correct parts will just be a guess without some of this information. VW/Audi also issued a TSB to replace just the inner bushings for the upper arms, but that procedure does not address the failure of the ball joints, which are not replaceable without replacing the control arm.
A number of suppliers sell complete front suspension kits with all of the control arms, ball joints and connecting members. While this might seem necessary on some cars, the high failure items are the upper ball joints/control arms and the tie rod ends (outer). Another failure item was the sway bar link that incorporated ball joints at each end. These have been replaced with links with bushings for better durability.
A repair reminder on this or any other model that uses bonded rubber bushings at locating positions: never finish-tighten any fasteners until the suspension has been loaded to its normal operating position. Since bonded rubber bushings can twist only so far, tightening them before the suspension is in its normal operation mode will most likely cause immediate failure.
Another point to look at when alignment specs are seriously out of spec is to check the location of the subframe in the car. There are locating holes to align the subframe, suspension components and the unibody. Since there is no actual alignment capability on these cars, subframe alignment is critical to suspension alignment.
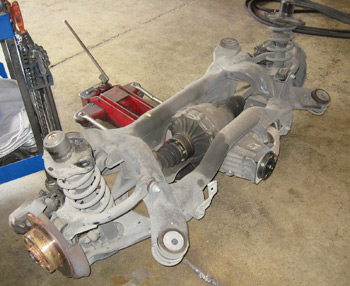
In the rear of these cars, the obvious differences are with FWD cars versus AWD (see Photo 3). Again, determining OE equipment through the data sticker will help in determining what parts and specs are needed. Different procedures for disassembly and repair are also listed based on the metals used for the various components. Rear alignment is also not possible for FWD cars and very limited for AWD models. Again, check to make sure that the suspension mounting components are installed properly in the vehicle, as failure to center the suspension in the body will affect alignment specs.
Cars with electronic stability systems or automatic headlight adjustment will require resetting or returning the car to basic settings using a scanner. Steering angle will need to be reset to basic settings after any procedure that would affect alignment. On some models, performing a basic drive cycle can reset the steering angle.
BRAKES
All of the VW and Audi models for these years have utilized standard (for VW/Audi) braking systems. As noted above, the important thing is to realize all the variables when sourcing specifications or parts.
Questions such as the engine code, type (4-, 6- or 8-cylinder), wheel size and ABS or ESP (electronic stability program) can be asked when determining replacement parts. Some models have integrated sensors in the pads for wear. Knowing the diameter and thickness of the rotors and whether they are vented or solid can help you get the correct parts the first time. Other electronic controls, such as EDL (electronic differential lock) and ASR (automatic slip reduction), can also have a part in parts selection.
Mechanical faults with the brake system are not common, unlike pattern failures for the ABS system. Looking through most of the complaints and from personal experience, many ABS faults are actually connection problems caused by corrosion or incorrect assembly. On more than one occasion, I’ve found the main connector for the ABS control module either not latched or poorly latched. I’ve also found corrosion problems that could be resolved by cleaning the connections and coating with dielectric grease.
Care should be taken during brake repairs to avoid pushing contaminated brake fluid back through the ABS module by loosening the bleeder after attaching a bleed hose before pushing the caliper pistons in after a pad replacement. System bleeding can be handled without a scanner using standard pressure or vacuum bleeding equipment. Use a quality, fresh DOT 4 fluid.
If the car doesn’t have brake pulsation problems, and the rotors are still within specs as far as thickness goes, my advice would be to not turn the rotors.
If there is any significant wear, grooving or even a hint of pulsation before replacing the pads, a rotor replacement is warranted. Removing any amount of material will most likely get them within replacement or minimum specifications any way and the car will most likely come back. On the cars with the larger brake systems, the rotors seem to hold up better, with the rotors outlasting the pads. Make sure the mounting surfaces of the wheels and hubs are clean and dry. Wheels should be torqued properly to prevent damaging the hubs from over tightening.
On all models, after replacing the rear brake pads and retracting the caliper pistons (the pistons need to be turned while depressing), apply the brake pedal several times to start the self-adjusting mechanism before making any adjustments to the cables for the parking brake. If the cables are tightened before the self-adjuster is actuated, the rear calipers will not operate properly and the brake pedal will always be low.
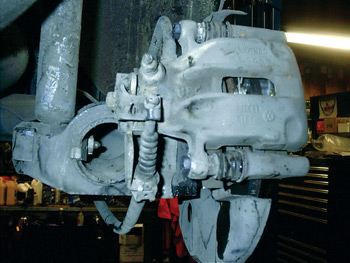
The parking brake most likely won’t work either. You can also start the self-adjuster by operating the park brake levers (either in the car or at the calipers) by hand several times after remounting the caliper. When doing this at the caliper lever you can easily see the pads apply, and see the adjustment take up while doing it this way. One caution though, make sure you have the park brake cable already attached to the lever before you operate the lever, or you might have to disconnect the cable at the other end to get it connected at the caliper (see Photo 4)!
EXHAUST
The exhaust systems on these cars are pretty typical. Most of the problems related to the exhaust system are related to the catalytic converters failing internally, fault codes related to the secondary air injection system or cat converter codes caused by failure of the air injection. You should never replace a converter on these cars until you’ve determined that the secondary air system is operating properly.
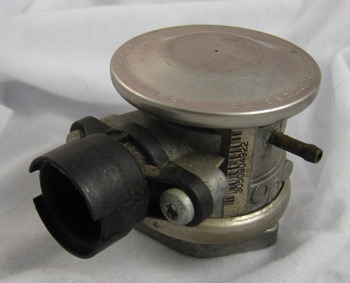
I won’t go into too much detail on the secondary air system in this article, as it can be confusing unless it’s covered in detail. The most common problem with the system is the failure of the vacuum lines that provide control for the combination secondary air and EGR valve. VW/Audi call this the “combi” valve (see Photo 5).
Performance exhaust systems are available from many suppliers, again providing for many ways and stages of personalization.


