
 Before performing an alignment, it is critical to perform a thorough inspection. First, make sure the suspension is not modified. Many Honda owners lower their Civics with inexpensive lowering kits and springs. Second, check the tire size and set the correct tire pressure. Use the information printed on the driver’s-side door pillar.
Check the suspension ball joints. (Hold a wheel with your hands and move it up and down and right and left to check for wobbling.) Honda has no wear specifications for the joint, except that it can not have any visible movement when pressure is put on the tire at 12 and 6 o’clock.
Bounce the vehicle up and down several times to settle the suspension. Listen for any rattles, clunks or pops. On some 2006 models and higher mileage vehicles, the front and rear bump stops can separate from the upper part of the stuts’ mounts and slide down the rod into the dust boot. The dust boots are made of hard plastic and as the strut compresses, it can cause a popping or crunching noise.
Front Suspension
The caster on the Civic is non-adjustable. If the measurement is not within specifications, check for bent or damaged suspension components.
The front camber can be adjusted by installing an adjustable bolt in the lower hole of the strut. The aftermarket cam-bolt kits will allow for 1.75º± of adjustment. Honda does sell non-cam bolt kits that have different diameter bolts that can be used in either the lower hole or in both holes. The torque for the bolts is 67 ft/lbs. 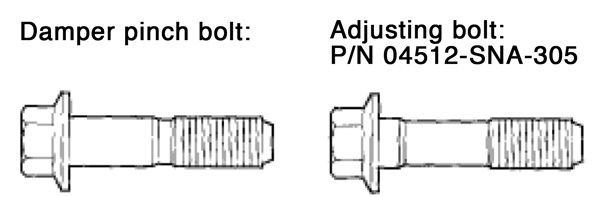
There are no special procedures for the front toe adjustment. Just make sure the bellows for the rack are not twisted and the bushings for the rack are in good condition. If the bushings, or even the bolts are loose, the driver my complain of a popping or clunking noise at low speeds. If the toe is adjusted, there are no documented steering position sensor reset procedures.
Rear Suspension
The rear suspension on the eighth-generation Civic uses a lower control arm and an upper link. The toe is adjustable, but requires extra parts to adjust the camber.
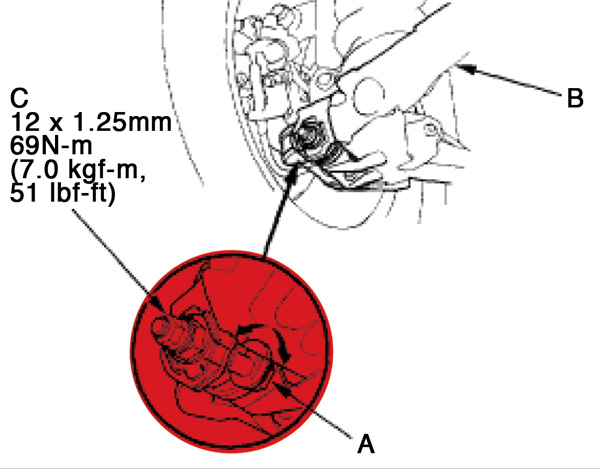 To adjust the rear toe, hold the adjusting bolt on the trailing arm, and remove the self-locking nut. Always use a new self-locking nut whenever it has been loosened. Reassemble the adjusting bolt and complete with the eccentric facing up. Adjust the rear toe by turning the adjusting bolt until the toe is correct and tighten the new self-locking nut while holding the adjusting bolt.
The rear camber is not factory adjustable. Adjusting the camber on 2006 and up Civics requires an aftermarket kit that replaces the bracket on the body for the upper link with a eccentric cam bolt. The kit will give ±1.25°of rear camber change. It requires a half hour of labor per side to install the kit.
The Mystery of the Letter “C” Rear Control Arms
For some 2006-2007 Civics, Honda issued a TSB about updated replacement rear control arms stamped with the letter “C”.
Honda was receiving complaints about uneven and rapid rear tire wear. Also, customers complained of a roaring noise from the rear, or a vibration at highway speeds.
Honda claimed the combination of the stock tires, rear suspension geometry and alignment angles caused rapid and uneven rear tire wear. Honda recommends the installation of new control rear arms stamped with the letter “C”. The new control arms take out .75º of camber from the rear. The same reduction in camber can be achieved with a bracket kit with a replacement eccentric cam bolt. This may be more economical than installing the control arms from Honda, and will allow for adjustments due to damage or as the vehicle ages. After the installation, align to the “C” specs.
VEHICLES:
•2006-07 2-Door (Except Si and Honda Accessory HFP Package)
•2006-07 4-Door – Except Si
•2006-07 Hybrid – ALL
•2008 Hybrid
(VIN JHMFA3…8S000001 thru JHMFA3…8S010456)
MORE IN THIS SERIES:
 Suspension & Alignment Specs: 2007-2010 Dodge Caliber
 Alignment & Suspension Specs: 2003-2007 Cadillac CTS
 Alignment and Suspension Specs: Ford Fusion 2006-2010


