 1. ORDERING PARTS FOR 2004
Starting with the 2004 model year, Ford launched a new body style for the F150. The new body style truck is a new vehicle inside and out. However, not all of the 2004 F150s that you see will be the new body style. The 2004 F150 was also made available in the older body style pickup that came on the scene in 1996. The older body style F150 is called a “Heritage” edition. The newer body style is simply referred to as an 2004 “new” model. You do need to be aware of this for correct ordering of parts, and parts look up.
2. VALVE STEMS
On some 2007-2008 F150s, the OEM valve stems leaked due to design flaws and defects in the materials. Leaks usually developed at the base of the stem and might only leak while the vehicle is moving due to the centrifugal forces on the stems.
To inspect the valve stems, apply light pressure to the valve stem cap with your finger and inspect the surface of the valve stem. Look for surface cracks at the base of the valve stem and listen for any slow air leak.
3. LIFTING
On the “new” model F-Series trucks, be sure to fold the side view mirrors in when raising these trucks on a two-post lift. The mirrors are large enough that they have been crushed by the plate or cap found at the top of the lift posts.
4. HOODS
This one issue might seem excessively simple to talk about, but can be very embarrassing in front of the customer if you are not prepared. The secondary hood release handle has moved on the 2008 Super Duty. It is now below the inside lower corner of the right headlight.
5. LATHES
One significant design change is to the front rotors. On the 4×2 “NEW” F150, the front wheel bearings are now sealed bearings that are pressed into the rotors and secured with a snap ring. This design calls for a special adapter for your bench-style brake lathe or on-the-car lathe. The 4×4 is a hubless design rotor and requires no special bench lathe adapter beyond what is needed for any hubless rotor.
6. STOCK RETAINING NUTS
You need to be aware that the retaining nut for the rotor is not intended for reuse. For this reason, it may be wise for your shop to stock two retaining nuts for 2004-and-up F150 2WD.
7. SHUDDER STRATEGY: COUNT THE FINS AND CHECK THE RACK
Some 2004/2005 F-150 trucks built before 11/29/2004 may exhibit front brake roughness and or shudder while braking. The full TSB is # 05-21-19. Vehicles built prior to 8/20/2003 require the replacement of the rack and pinion assembly if it has not been replaced.
To determine if the vehicle has the old- or new-style rotors (or even if the aftermarket rotors are well designed) count the number of fins. The new-style rotors have 47 fins.
8. TIRE SHOULDER WEAR: CHANGE YOUR SPECS
Some 2004-2006 F-150 vehicles (excluding Heritage) built before 11/1/2005, equipped with only the following tires or the same replacement sizes, may exhibit rapid tire shoulder wear on the inside edge of the front tires:
• Hankook P235/70 R17 XL
• General P255/70 R17
• Continental P255/65 R17
Ford recommends adjusting the alignment specs and rotation if possible only if the tread depth of the inside shoulder is worn more than 1/2 of the tread depth of other ribs if the tires are exhibiting inside shoulder (toe) wear. If this is the case, set the front total toe to 0.30 +/- 0.05 degrees, also check camber and caster angles are within specification.
9. CHECK TIRE SIZE IF DRIVER COMPLAINS OF “BINDING” DURING BRAKING
On 2006-2008 trucks equipped with either 4WD or all-wheel-drive and equipped with Control Trac, some customers may complain of binding in slow speed turns or noise from the front driveline and/or transfer case. The shudder/binding will occur with the vehicle being operated in the AWD/auto 4×4 mode. The shudder/binding may be due to incorrect tire circumference or improper tire inflation pressures.
If the tires’ circumference average between the front and rear axles are outside of the 1/2 inch specification or if the tire circumference from side to side on either axle exceeds 1/2 inch difference, the smaller tire must be replaced.
10. CHECK THE PARKING BRAKE IF A VIBRATION OR SHUDDER IS FELT IN THE REAR
Some 2004-2008 F150 may exhibit an intermittent vibration or shudder from the rear of the vehicle typically at speeds 45 MPH and higher. This may be caused by the parking brake remaining partially engaged.
Affected vehicles were produced at: Dearborn Truck Plant before 2/13/2008, Kansas City Assembly Plant before 2/18/2008 and all 2004-2007 vehicles produced at Norfolk Assembly Plant.
Inspect the parking brake assembly for evidence of remaining partially engaged and repair. If the parking brake system does not indicate signs of trouble, this is not the cause of the vibration. Do not continue.
2004-2005 Trucks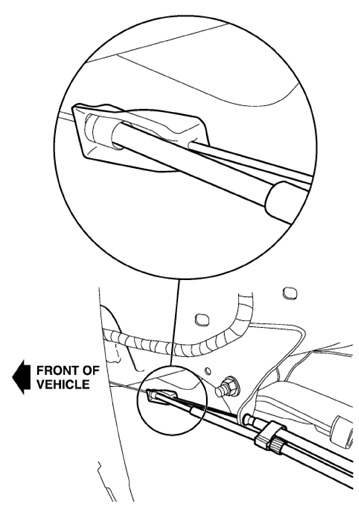
1. Replace both the right and left parking brake actuator levers and replace the parking brake cable assembly on the affected side of the vehicle only. Refer to WSM,
Section 206-00 for 2004, Section 206-05 for 2005. Refer to parts list to determine the correct cable assembly.
2. Correctly position the parking brake cable equalizer to ensure the left and right parking brake cables do not twist or bind during operation. 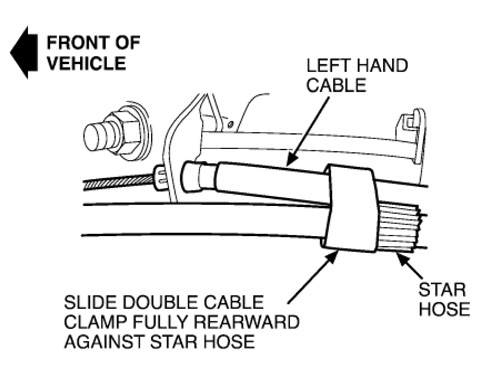 (Figure 1 – left side)
3. Inspect the double cable clamp for debris and/or damage. Replace as required.
4. Clean the sheathing on both parking brake cables where the double cable clamp will be positioned (Figure 2 – left side).
5. Spray an even coat of Silicone spray lubricant, on the sheathing of both parking brake cables where the double cable clamp will be positioned.
2006-2008 Trucks
1. Replace the parking brake cable assembly on the affected side of the vehicle only.
2. Correctly position the parking brake cable equalizer to ensure the left and right parking brake cables do not twist or bind during operation.
3. Inspect the double cable clamp for debris and/or damage. Replace as required.
4. Use a shop towel to clean the sheathing on both parking brake cables where the double cable clamp will be positioned.
5. Spray an even coat of silicone spray on the sheathing of both cables where the double cable clamp will be positioned (Figure 2).


