 The Dodge Charger Police Package entered service in 2006. Compared to the civilian model, the police variant’s suspension is the same, except for some changes in the the sway bars, shock valving and changes to the ABS and stability control software. In 2011, Chrysler is introducing a Pursuit version with heavy-duty performance front and rear suspensions with load-leveling/NIVOMAT shocks.
The main goal of performing an alignment on a police Charger is to extend the life of the tires. Next to gas, tires are the largest operating expense for these vehicles. All models use P225/60R18 tires mounted on steel rims that can last 8,000 to 16,000 miles depending on how the car is used on patrol.
FRONT SUSPENSION
The Charger is a “net-build.” This means there are no factory adjustments for camber or caster built into the vehicle.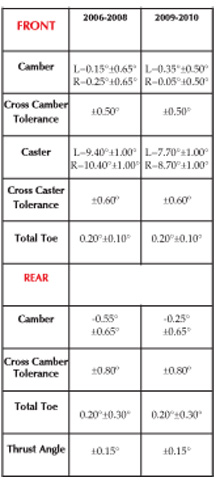 The factory recommended procedure is to shift the front cradle to correct problems. To do this you have to understand that if you are trying to add camber to one side, you are taking it away from the other side. By using this approach it is possible to adjust the camber ±.3º and ±1º of caster if the front suspension is in good working order. Chrysler recommends billing one hour of labor for this procedure.
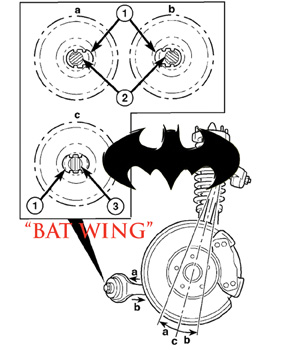
The Chrysler bolt kit for the lower control arms works with the uniquely grooved slots in the arms calls “bat wings.” Why do they call them “bat wings?” Because they look like the Batman’s symbol when the nut is off. The bolt kit includes two grooved bolts that can adjust the camber by ±0.3º and caster by ±0.3º depending on how bolts are used. The bolts must be rotated 180° to achieve either more positive or negative camber or caster.
The better option is to install adjustable upper control arms that can adjust camber by ±2.0º and caster by ±1.5º. This option can save money for the owner during the life of the vehicle considering the vehicle may be in service for more than 150,000 miles.
The positive toe angle on the front and rear is designed there to give greater straight-line stablity and better turn-in performance. Do not assume that setting the toe to zero will give the best possible tire wear. This could cause a conflict with the caster angle.
REAR SUSPENSION
The rear suspension does not have built-in adjustments for camber. Aftermarket bushings can be installed in the upper links that can change the camber between ±.75º or ±1.5º depending on the bushings used and how they are placed in the links. But, it has been reported by some fleet managers that if the camber is to far out of specifications, technicians should first check for damage and the ride height before installing the bushings.
 Toe is adjusted by altering the toe link’s eccentric adjusters on the cross member. When adjusting the rear toe, the lobes on the toe adjustment cam bolts and washers are not to be facing downward. The lobes should only be facing upward or up to 90° to one side or the other from the 12 o’clock position.
Rear toe and camber angles change as the car squats under acceleration or rises under braking. This height-sensitive geometry feature gives the vehicle more stability. If the rear ride height is below specifications either due to heavy loads or weak springs, the inner edge of the tires will be worn. Correct problems before proceding with the alignment.
Before You Pull into the Alignment Bay:
• Fill the tank. The reduction in weight will affect the ride height and the alignment angles.
• Ask the officer what is usually kept in the trunk. When a car is taken in for service, the officer may remove up to 200 lbs of equipment from the trunk. Excessive weight can change the angles when the vehicle goes back into service.
• Check the spare and make sure all four tires match.
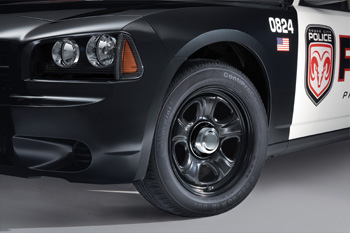 • All of the Police Chargers have steel 18-inch rims. Inspect them for any damage or runout. This could be a sign of suspension damage. These rims are designed to go over curbs with out cracking or losing air, but they will deform.
TPMS Reset Procedure
1. Inflate all tires to correct pressure specification as indicated on the Vehicle Tire Placard.
2. Park vehicle with the ignition switch set to the off position for 20 minutes.
3. Drive the vehicle faster than 15 mph for at least 20 minutes. The sensor locations and ID numbers will be automatically registered during drive cycle.
During this reset period, the instrument panel TPMS indicator may be illuminated. This is normal unless the indicator is flashing. It will turn off after a period of driving at a sufficient speed, usually one to 20 minutes at speeds more than 15 to20 mph. If your initial drive is too short, the process will reinitiate the next time the vehicle is driven.
The alternative procedure is to perform the TPMS sensor initialization procedure using a scan tool. This will turn off the instrument panel TPMS indicator.


